Sunday, 26 January 2014

How to Format Friend’s Hard Disk -Fakely

In this post i am going to share you about some funny fake tricks.Here is  some  funny trick which you will find amazing and frighten your friend with this prank.

Funny trick 1

    Download Fake delete.zip and unzip the files.
    Now open the folder and open the file fakedel.exe. You can see that the deleting  seems so realistic. But this is just fake and nothing happens to your computer.
    Now rename this file with abc.exe and paste this file on your friend’s desktop or Email it to him/her with some interesting  message so that he/she will curiously open the file.

To Stop Fakedel.exe go to Taskbar > TaskManager > fakedel.exe > End Process

Funny trick 2

    Download Fake Format and unzip the files.
    Now open the folder and open the file fakefmt.exe. You can see that the formating seems so realistic. But this is just fake and nothing happens to your computer.
    Now rename this file with abc.exe and paste this file on your friend’s desktop or Email it to him/her with some interesting  message so that he/she will curiously open the file.

To Stop Fakefmt.exe go to Taskbar > TaskManager > fakefmt.exe > End Process

Labels:

How to hide data in notepad

Hello friends
  Today we are going to discuss how to hide data in notepad.

Steps:
  1. Open command prompt start-run and type cmd.
  2. Now navigate to directory you needed I here make directory to desktop ie type  cd desktop 
  3. Now type as below
notepad filename.txt: hidden
    
     4.. Write some data and save the file.
     5. Browse to the file location and Open filename.txt you cannot see any data in the file
Note:
  • This works only on NTFS file system.
  • To retrieve data back open command prompt and type.
Notepad filename.txt:hidden

Labels:

How to: Create Bootable Windows 8 ISO DVD


Recently I have downloaded leaked version of windows 8 RTM,In that it had only flat installation file and there were no bootable ISO image.So in order to install this from DVD we cant to create ISO image first.
Just follow this simple steps to do it.

Stuffs needed:
       It is a command line cd/dvd ROM pre mastering tool,for more tutorial about this tool visit
  • Windows setup files
Steps:
1.First up all you need to keep all window installation files in in one folder.For example i keep it in (C/win8)
2.Run the downloaded tool as administrator.Note you need to have microsoft .NET 4.
3. Type following code.
oscdimg.exe –l<Disc_Label> -m -u2 –b<path_of_bootable_img_file>
 <path_of_installation_file> <path_with_filename_is_to_be_created>
Note :
  • -l is used to set volume label of DVD
  • -m is used to create bigger image file than 700MB
  • -u2 is used to create UDF file system for DVD
  • -b is used to locate boot image of DVD
For example:
oscdimg.exe -lwin8 -m -u2 -bC:\win8\boot\etfsboot.com C:\win8 C:\win8.ISO
After this it will scan source tree and create ISO image file
4.Now can cd/dvd burning softwares and burn your bootable media

Labels:

How to disable right click on desktop


In this post  i am going to show you how to disable right click in desktop.To make this you have to be logged on system with administrative rights.By following given steps to disable the right click functionality on desktop:

To use this feature, you will need to be logged into your computer with administrative rights.

  1. Click Start button and type regedit in Run option then press Enter for next.
  2. Go to  HKEY_LOCAL_MACHINE\Software\Microsoft\Windows\CurrentVersion\Policies\Explorer
  3. In right side panel, right click to create a new DWORD value with the name NoViewContextMenu (it is case sensitive), then assign number 1 in value data box.


Note:Adding the registry tweak above will disable mouse right click for ALL users. If you only want to disable for the current logged in user, you should add the registry tweak to HKEY_CURRENT_USER instead of HKEY_LOCAL_MACHINE.

Labels:

Monday, 13 January 2014

How To Recover Permanently Deleted Files


Looking for How To Recover Permanently Deleted Files? Get back files which you deleted permanently by mistake with free data recovery software download.
How To Recover Permanently Deleted Files
Below is step by step tutorial to recover files back which you accidentally deleted from computer.

How To Recover Permanently Deleted Files

First of all you’ll good data recovery software? Don’t worry I have given link of a good one below. Normally the data recovery software which actually does the job are very expensive. But here I have provided link of a free one. This is EaseUS data recovery wizard. I have tested this data recovery software myself and successfully recovered video from drive even after disk was formatted multiple times. This data recovery software can also work if you have changed partitions.
free data recovery


There are plenty of recovery software out in market but no one does the file recovery so good than EASEUS Data Recovery Wizard Professional software. This recovery software is fully working. There are several options in this data recovery software. You can do normal recovery which is used if you recently delete those files from computer. You can also select deep recovery option if the files were deleted long ago and you want to recover files back. The most powerful option is hard drive partition recovery. Please keep in mind that data recovery process may take time as it has to scan through hard disk data tables.
How To Recover Permanently Deleted Files free

Features of EaseUS Data Recovery Software

Recover files deleted from recycle Bin
Recover files deleted with shift del command
Recover files after accidentally formatting USB or Memory Card
Complete partition recovery after PC crash
Resolve Media Card Errors
Solve SD Card Corruption Issues
Multiple File System Supported
Huge Type of Hard Drives, Pen Drives and SD Card supported.
For more detailed features please click here to visit the official website.
data recovery software free download

Data Recovery Software System Requirements

Below are minimum system requirements for Data Recovery Software.
Windows 8, 7, Vista, XP, 2000
RAM: 128 MB
32 MB Hard Disk Space

Data Recovery Software Free Download

This is single link download for this recovery software. let me know if you face any issues while doing recovery of your hard drives. Feel free to discuss in comments. This is official free Version.

Labels:

Saturday, 14 December 2013

Emsisoft Anti-Malware Free Download


Emsisoft anti-malware free download software setup in single direct link. Protect PC against malware virus threats. Secure PC from worms make it more fast.

Emsisoft Anti-Malware Overview

Emsisoft Anti-Malware is a sophisticated security tool designed to keep your computer safe from all nasty and malicious files, in whatever outfit like viruses, Trojan horses, spyware or adware.
Emsisoft Anti-Malware Free Download

The application depends on two powerful and dominant scanning engines and as a result blocks a huge amount of infections out there and make it certain that your computer is clean of malware and viruses.
If you need to examine your cookies, the application will recommend closing your Web browser. Custom not only lets you choose which folders to scan, but also lets you opt out of heuristic, tracking-cookie, and spyware-remnant scans.
Emsisoft Anti-Malware Free Download setup
The ‘Security Status’ tab checks whether File Guard Surf Protection options are working are not. It also gives you the possibility to start a new scan or update the virus definitions.
Emsisoft Anti-Malware needs a rational amount of computer resources, but a complete and through scan will critically give your system a trauma, so make it certain that all programs are closed before you start a scan.
Download Emisoft AntiMawlare free
On a conclusive note we can say that this is one of the best security tools on the market and we strongly recommend you to give it a try as soon as possible.

Features of Emsisoft Anti-Malwre:

Listed below are some of the features that you will experience after Emsisoft Anti-Malware Free Download.
  • Three protection layers: Surf Protection, File Guard, and Behavior Blocker
  • Relies on two scan engines
  • Schedule scans
  • Sophisticated security tool
  • Automatic updates
  • Set up restrictions for non-admin users
Emsisoft Anti Malware

Emsisoft Anti-Malware System Requirements

Before you start Emsisoft Anti-Malware Free Download make sure your system meets the minimum system requirements.
  • Operating System: Windows XP, Vista, 7 and 8
  • Processor: Pentium I
  • RAM: 256MB
  • Hard Disk Space: 145MB space required

Technical Setup Details For Emsisoft Anti-Malware

  • Software Name: Emsisoft Anti-Malware 8.1.0.33
  • File name: EmsisoftAntiMalwareSetup.exe
  • Setup Full Size: 214.20 MB
  • Latest Version Release Added On: 14th Dec 2013
  • Developers: EmsiSoft

Emsisoft Anti-Malware Free Download

Click on below button to Emsisoft Anti-Malware Free Download. This is complete offline installer and full standalone setup for Emsisoft Anti-Malware. This will work for both 32 Bit and 64 Bit operating systems.

Labels:

Thursday, 12 December 2013

Windows 7 Commands Every Administrator Should Know


windows7logo-580-75PC troubleshooting is becoming less common in larger organizations, but consultants and techs in smaller shops still have to get their hands dirty identifying and fixing desktop problems. Oftentimes, troubleshooting Windows 7means delving into the command line. Here are 10 fundamental Windows 7commands you might find helpful.

1: System File Checker

Malicious software will often attempt to replace core system files with modified versions in an effort to take control of the system. TheSystem File Checker can be used to verify the integrity of the Windows system files. If any of the files are found to be missing or corrupt, they will be replaced. You can run the System File Checker by using this command:

sfc /scannow

2: File Signature Verification

One way to verify the integrity of a system is to make sure that all the system files are digitally signed. You can accomplish this with the File Signature Verification tool. This tool is launched from the command line but uses a GUI interface. It will tell you which system files are signed and which aren’t. As a rule, all the system files should be digitally signed, although some hardware vendors don’t sign driver files. The command used to launch the File Signature Verification tool is:

sigverif

3: Driverquery

Incorrect device drivers can lead to any number of system problems. If you want to see which drivers are installed on a Windows 7 system, you can do so by running the driverquery tool. This simple command-line tool provides information about each driver that is being used. The command is:

driverquery

If you need a bit more information, you can append the -v switch. Another option is to append the -si switch, which causes the tool to display signature information for the drivers. Here’s how they look:

driverquery -v

driverquery -si

4: Nslookup

The nslookup tool can help you to verify that DNS name resolution is working correctly. When you run nslookup against a host name, the tool will show you how the name was resolved, as well as which DNS server was used during the lookup. This tool can be extremely helpful when troubleshooting problems related to legacy DNS records that still exist but that are no longer correct.

To use this tool, just enter the nslookup command, followed by the name of the host you want to resolve. For example:

nslookup dc1.contoso.com

5: Ping

Ping is probably the simplest of all diagnostic commands. It’s used to verify basic TCP/IP connectivity to a network host. To use it, simply enter the command, followed by the name or IP address of the host you want to test. For example:

ping 192.168.1.1

Keep in mind that this command will work only if Internet Control Message Protocol (ICMP) traffic is allowed to pass between the two machines. If at any point a firewall is blocking ICMP traffic, the ping will fail.

6: Pathping

Ping does a good job of telling you whether two machines can communicate with one another over TCP/IP, but if a ping does fail, you won’t receive any information regarding the nature of the failure. This is where the pathping utility comes in.

Pathping is designed for environments in which one or more routers exist between hosts. It sends a series of packets to each router that’s in the path to the destination host in an effort to determine whether the router is performing slowly or dropping packets. At its simplest, the syntax for pathping is identical to that of the ping command (although there are some optional switches you can use). The command looks like this:

pathping 192.168.1.1

7: Ipconfig

The ipconfig command is used to view or modify a computer’s IP addresses. For example, if you wanted to view a Windows 7 system’s full IP configuration, you could use the following command:

ipconfig /all

Assuming that the system has acquired its IP address from a DHCP server, you can use the ipconfig command to release and then renew the IP address. Doing so involves using the following commands:

ipconfig /release

ipconfig /renew

Another handy thing you can do with ipconfig is flush the DNS resolver cache. This can be helpful when a system is resolving DNS addresses incorrectly. You can flush the DNS cache by using this command:

ipconfig /flushdns

8: Repair-bde

If a drive that is encrypted with BitLocker has problems, you can sometimes recover the data using a utility called repair-bde. To use this command, you will need a destination drive to which the recovered data can be written, as well as your BitLocker recovery key or recovery password. The basic syntax for this command is:

repair-bde -rk | rp 

You must specify the source drive, the destination drive, and either the rk (recovery key) or the rp (recovery password) switch, along with the path to the recovery key or the recovery password. Here are two examples of how to use this utility:

repair-bde c: d: -rk e:\recovery.bek

repair-bde c: d: -rp 111111-111111-111111-111111-111111-111111

9: Tasklist

The tasklist command is designed to provide information about the tasks that are running on aWindows 7 system. At its most basic, you can enter the following command:

tasklist

The tasklist command has numerous optional switches, but there are a couple I want to mention. One is the -m switch, which causes tasklist to display all the DLL modules associated with a task. The other is the -svc switch, which lists the services that support each task. Here’s how they look:

tasklist -m

tasklist -svc

10: Taskkill

The taskkill command terminates a task, either by name (which is referred to as the image name) or by process ID. The syntax for this command is simple. You must follow the taskkill command with -pid (process ID) or -im (image name) and the name or process ID of the task that you want to terminate. Here are two examples of how this command works:

taskkill -pid 4104

taskkill -im iexplore.exe

Labels:

Friday, 18 October 2013

How To Fix Fingerprint Reader on HP ProBook


Easy steps on How To Fix Fingerprint Reader on HP ProBook. Easily Fix Fingerprint Scanner on HP ProBook Laptop Series and Setup Biometric password.

Fix Fingerprint Reader on HP probook
It took me long to find correct way to setup fingerprint reader in HP probook series laptop. Initially when I purchased laptop the installed OS had already setup every thing. But soon after re installing new Windows, I was unable to Fix Fingerprint scanner on HP laptop. I searched on HP forums to setup biometric in probook but none of the post help me.
Finally I found a way to fix fingerprint reader and setup fingerprint password in HP Probook laptop. I though I should share it with all those guyz who are facing problem with fingerprint scanner in HP probook series.

Learn To Fix Fingerprint Reader on HP ProBook

This is complete step by Step tutorial to setup biometrix fingerprint reader on HP Probook series laptop.

Step 1: Download Microsoft .NET Framework 4.5

To setup fingerprint biometric reader on HP Probook series, first of all you have to download latest .NET Framwork 4.5. I have provided direct download link for .NET 4.5 This is official Microsoft link for standalone installer of .NET 4.5
download button

After download you have to install .NET Framework 4.5 setup file named (dotnetfx45_full_x86_x64.exe). Without installation of .NET framework 4.5 the below HP applications cannot be installed.
Fix Fingerprint Reader on HP step 1 .net install

Step 2: Download HP ProtectTools Security Manager

Now the second important step to fix HP fingerprint scanner is to download HP Protecttools security manager. This is needed to setup HP biometric fingerprint reader in Probook series laptop. The download link is from official HP website.
download button
Once security manager is downloaded, install its setup file and wait until the installation is complete.
Fix Fingerprint scanner on probook step 2
Once installation is complete, restart your laptop.

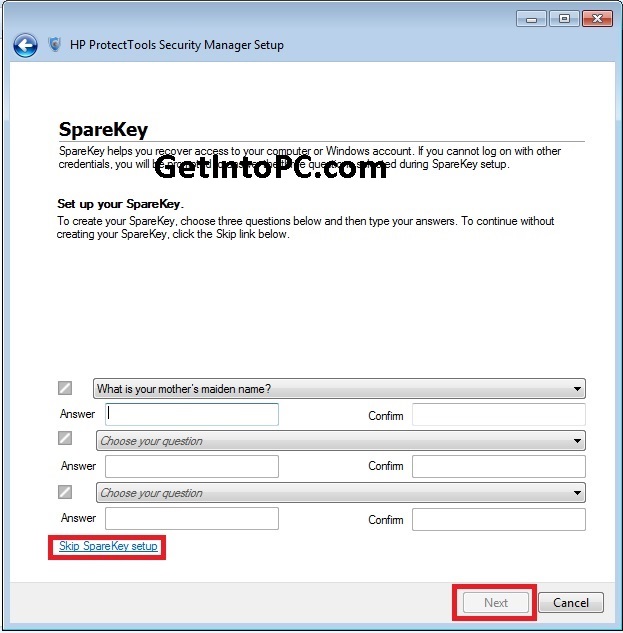
Step 3: Configuration of ProtectTools Security Manager

After PC is restarted you’ll see below screen to start Configuration of ProtectTools Security manager. You have to configure it.
Fix HP Fingerprint Reader on Probook step 3
Security manager will require Windows Password. You can give recovery question answers as well. Once its configuration is complete. Then go to step 4.
Fix biometric Reader on HP step 4

Step 4: Download Device Access Manager for ProtectTools

Third step is to install HP Device Access Manager application. This is also necessary tool which should be installed before fixing HP fingerprint biometric scanner on probook series. Click on below button to download Device Access Manager from official HP Link.
download button

After downloading, install HP Device Access Manager as per below screenshot.
Fix HP biometric Fingerprint Reader on probook step 5

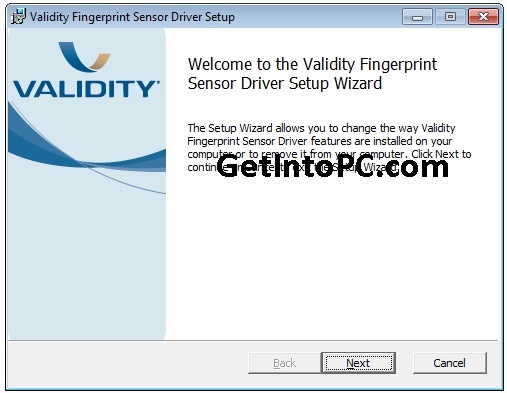
Step 5: Download HP Biometric Device Driver

The last tool to install is the biometric device driver. This can be downloaded from official HP driver site. First select your laptop model and then download this biometric sensor driver. I have provided the link for HP Probook 4540s Biometric driver. If you have different HP Probook model you can download its biometric driver from here.
download button
Install Biometric Device Driver as per below screenshot.
setup Fingerprint password on hp probook step 6

After this you’ll prompted for another validity biometric driver. Install it as per below snapshot.
Fixing Fingerprint sensor on probook laptop step 7

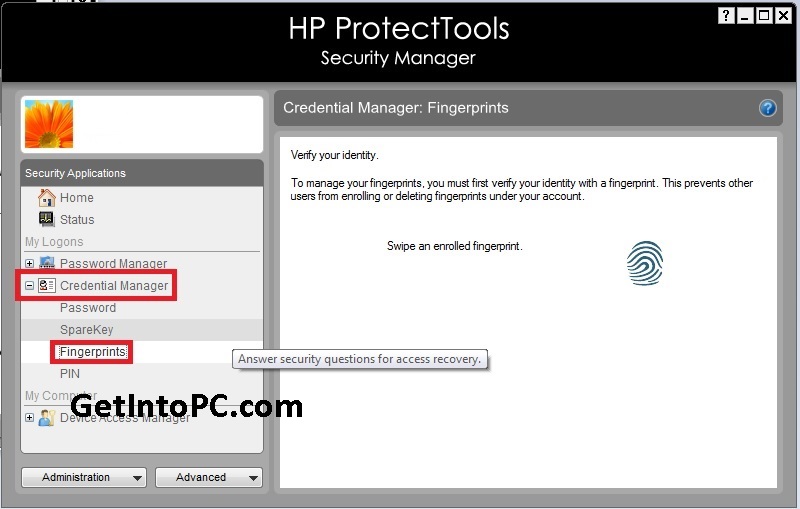
Step 6: Final Configuration to Setup Fingerprint Sensor

Now when all of the above are downloaded and installed in order. Just swipe your finger on laptop’s biometric sensor. The below screen would appear.
Fix Finger Reader on HP laptop step 8
Click on Manage Link and below screen will appear.
Fix biometric sensor on HP 4540s
Expand Credentials Manager and click on FingerPrints as per below screen.
setp fingerprint password on hp probook laptop
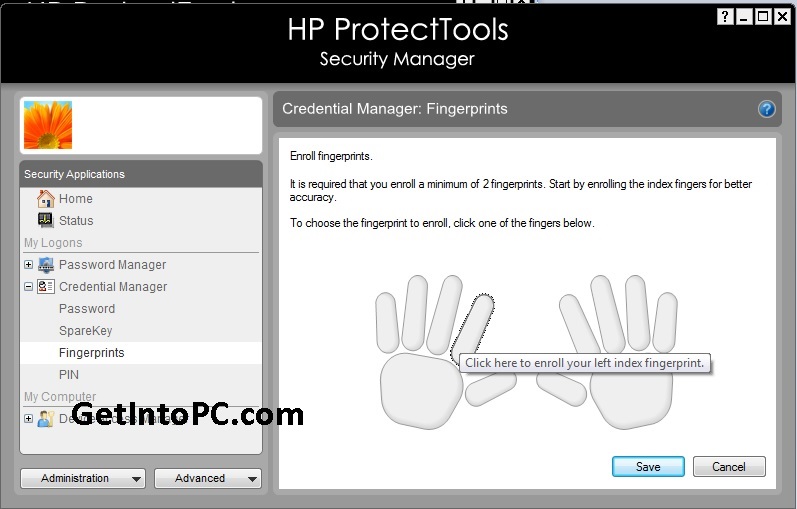
Click on any finger and swipe finger as per on screen instructions. You have to set al-least 2 fingers for fingerprint password.
Now logoff and on windows logon screen only swipe your finger. All done.
Now I hope you have successfully implemented HP Biometric fingerprint reader fix. This will help you to setup fingerprint password for HP Probook series. Let us know if you faced any issue while fixing fingerprint scanner in HP Probook.

Labels:

Sunday, 13 October 2013

How to Install Linux on PC – Ubuntu Step by Step Guide


Learn How to Install Linux on PC. Ubuntu is a linux Operating System. It is a very firm OS for developers. Read step by step guide to install linux on PC.

how to install linux on PC ubuntu

Linux Installation Overview

Ubuntu has some pre-installed tweaks that we cant forget. It is a freeware, so you can download it from its official website Here. In this tutorial, you will learn to install Ubuntu OS on your PC. Just follow the given instructions step by step.
Step#1 There are two ways of installing Ubuntu OS on your PC.
  • CD/DVD
  • USB
You can also download linux iso from here.
If you are using a CD/DVD, Restart your computer and Insert your disk.There you will see is an option to ‘BOOT FROM DVD”. Select it and next you will be watching is a ‘WELCOME’ Screen. Now choose your language and begin the installation.

How to Install Linux on PC – Steps With Screenshots

If your are using a USB drive. Press F12 key continuously and then you will get your BOOT options. Select on ‘BOOT FROM USB”. Select it, choose your language and begin the installation.
desktop-install-1


Step#2 The next step is to prepare your PC for installing Ubuntu. It will check that your PC is connected to a POWER SOURCE and you have enough space yo install the OS on your drive.
desktop-install-2

Step#3 While installing the OS there is an option to Download the updates. If you want to download check on it and select your Wi-Fi Connection and give it the WEP key, if you have one.
desktop-1204-install-3

Step#4 Now Allocate the drive to install your OS. If you are a windows user and also have windows installed on your drive, you can use both on your PC but once at a time. If you want to clear the drive and only want to use Ubuntu then select the second option. If you are an Advance User and want to Install it by your own way then select ‘SOMETHING ELSE’.
desktop-1204-install-4 (1)Step#5 Ubuntu needs 4.8 GB of space to install. If you have selected the Installation type then click on the drive to install. Don’t worry about installing it along windows.It is easy and simple, also very safe to use. You can uninstall any of the OS at any-time.
desktop-1204-install-5

Step#6 Select you location and Proceed to ‘Forward’. If you are connected to Internet, it will auto detect your location. If its wrong then change it.
desktop-1210-install-where

Step#7 Select your ‘Preferred Keyboard Layout’, if you dont know what it means then click on ‘AUTO DETECT’.
desktop-1210-install-keyboaStep#8 Now Setup you Login Credentials, it will require your name, Username and Password.
desktop-1210-install-who

Step#9 While Ubuntu Installs its Important components Grab a cup of coffee and learn more about Using Ubuntu.
desktop-1304-install-teaStep#10 Congratulations, You have Installed Ubuntu OS on your PC. To get started click on ‘Reboot Now’ and when it gets boot, enjoy your new OS.
desktop-1204-install-10

Conclusion – You successfully Installed Linux on PC

If you have followed the above tutorial with step by step. Linux is very secure and high performing as compared to windows. Let us know if you faced any issues during Linux installation on PC.

Labels:

How To Install Windows 7 – Step By Step Method For Beginners


Learn How To Install Windows 7 on PC or Laptop. This is Step By Step Method For Beginners with screenshots. You can easily install windows 7 by below steps.

Windows 7 Installation Overview

You should have to get your System Specifications and then search for it on Google. If Windows 7 Supports your system then begin this tutorial step by step. In this tutorial you will learn How To Install Windows 7.

Things You’ll Need Before Windows 7 Installation

If you already have boot-able CD/DVD then you can skip this part. Otherwise if you need to have Windows 7 ISO download then click here. Also if you want to install windows 7 with USB then make flash drive boot-able by following this method.

How To Install Windows 7 – Steps

Step#1 Turn ON your PC and Press ‘F2′ Continuously. There will come up and option to boot through CD/DVD. Select that option. Windows will start loading its files.
windows7_1
Step#2 Now you will get the Windows Setup Window. This is the part to select Language for your windows. Select ‘English’ and click Next. Also there will be a ‘INSTALL NOW’ button. Click on it and proceed to next step.
How To Install Windows 7

Step#3 There will be a license agreement. Check on ‘I ACCEPT’ and proceed to NEXT. After that there will be an option to install windows. ‘UPGRADE’ and ‘CUSTOM’. Right now we are installing a clean version so Click on CUSTOM.
windows-7-install-type
Step#4 In this step you will do partitioning of your drive. Be careful, this is the most important part of the Installation. In this you will allocate spaces to your drive. If you want to create a new drive, simply click on a drive and then click ‘NEW’. A new drive will be created.
windows 7 how to install
Step#5 When you have created the drives, Simply Select the drive in which you want to install windows. Click ‘Format’, this will erase all the previous data on you that drive. Click on ‘NEXT’ to proceed.
windows-7-install-layout
Step#6 Now you windows will start installing its files. Grab a cup of coffee and wait for a few minutes while it install. During this process don’t plug in or off your device. It might cause interruption and you might loose your data and have to begin the process all over again.
windows-7-install-installing
Step#7 Now when you files are installed. Your PC will be rebooted and now you will see is a ‘User Settings’ Screen. Simply add your Name and password and proceed to ‘NEXT’
windows-7-install-username
Step#8 In this step you have to activate your windows. Simply look at the back of your Windows CD/DVD cover there will be a PRODUCT KEY. Add this key into your PC and Click ‘NEXT’.
windows-7-install-activation-key
Step#9 Now you have Installed you windows. Give the desired information the Windows Step guide will ask, like Time Zone, Update Timing and Your Computers location. There are three types of location. ‘WORK’, ‘PUBLIC’ and ‘HOME’. Select on anyone of the them according to your location. It only add sharing security according to your location.
windows-7-install-location
Last Step – Congratulations:- You have installed you windows. Now you can see is your desktop. It is simple to use, setup your desktop and enjoy!
windows-7-install-installed
This Post Was Last Updated On: September 29, 2013 By Ramadhani Ndijuye

Labels:

How to Use Camstudio to Record Your PC Screen Activity

CAMSTUDIO- OVERVIEW

Camstudio is the open source software.It’s basic purpose is to record the audio and video of all screen activity of your’s on own computer. It is not renowned for best quality videos but it is completely free.It is a lot easier to record on-screen tasks and show to others. First of all you can download camstudio from below Button.

RECORD YOUR ON-SCREEN TASKS

1) Install two different files (the main program allowed by codec).Once it is done now open the camstudio. you will see on the right side ‘RECORD’ .
How to Use Camstudio to Record Your PC Screen Activity


2)Before recording. select the region area of your screen you want to record.
How to Record Your PC Screen Activity
3)Go to the Options -> Video options.
How to save PC Screen Activity
Select the quality of video according to your need because the default quality is 70.
cam 04
MicrosoftVideo 1 is the default compressor but you can use other options.
cam 05
you can configure the settings of compressor. Remember every compressor has unique settings if you changed the compressor then you have to go back and check settings again.
desktop screen recording
Choose the CamStudio Lossless Codec v1.4. while using the software it gives the best result.
pc screen recording
3)Go back to the main menu you will see the last button is toggling between .AVI and .SWF output .Once you satisfied with the setting, Click on RED BUTTON to start recording.
cam 08
4)when you want to stop recording. Click on the system tray icon and select your option.
cam 09
5)when recording finished. Window will prompt and save it to your desired location and format
cam 10
Once file saved .movie player window will open automatically and play your’s recording.
cam 11

Conclusion – Easily Record PC Desktop Screen Activity

So I hope if you have followed the tutorial, now you can record computer screen activity. The steps to record desktop session were simple. Still if you faced any issue you can let us know and we’ll help you to solve problems related to desktop recording. Camstudio is very easy to use software in this regard.
This Post Was Last Updated On: October 12, 2013 By Ramadhani Ndijuye

Labels: